VPS面板已经被作者废弃多年,但是在当年还是很牛bB的所在,今天有空拿出来折腾看还能不能用。记录如下:
1、安装面板
wget http://www.vpsmate.org/tools/install.py
python install.py
中途会要求输入用户名和密码。
不到一分钟的时间,vpsmate就安装完毕了
然而安上去的只是一个面板而已,打开看了看,内存占用不到30m,真爽!
2、安装组件
不出所料,安装过程中包故障了 解决方法如下
vi /etc/yum.repos.d/epel.repo
把
#baseurl xxxxxxxxxxxxxxxxxxxx
mirrorlist xxxxxxxxxxxxxxxxxxxx
改成
baseurl xxxxxxxxxxxxxxxxxxxx
#mirrorlist xxxxxxxxxxxxxxxxxxxx
总共有三个地方要改,改完后,为了安全,建议重启一次机器。
当然,可以用 vpsmate 的文件管理找到这个文件,在线进行更改,然后在系统工具下面对vps进行在线重启
3、优化mysql
在MySQL的配置文件/etc/my.cnf 中
my.cnf 的 [mysqld] 下加上:
default-storage-engine=MYISAM
innodb=OFF
这是把默认的myspl引擎innodb替换成myisam,可以节省内存
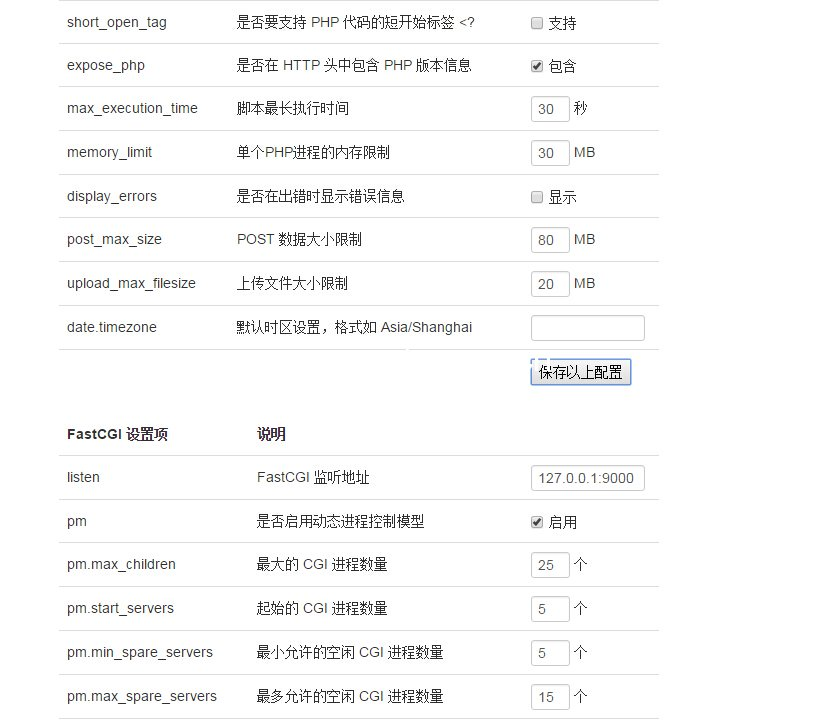
4、优化PHP
5、其他优化
一、干掉 SendMail 进程
用 putty 登录到vps,输入top命令,在输入M,可以查看运行的各个进程和内存使用率。里面逐一查看,没用的干掉。首先牺牲的是SendMail,我基本用不到它。
执行命令:
- service sendmail stop
再执行:
- chkconfig --list sendmail
此时显示: sendmail 0:off 1:off 2:on 3:on 4:on 5:on 6:off
- chkconfig --level 2345 sendmail off
这样sendmail被彻底关闭了。
二、nginx配置
打开nginx的配置文件 nginx.conf(我使用的LNMP在 /usr/local/nginx/conf/nginx.conf )
- vim /usr/local/nginx/conf/nginx.conf
1、找到 worker_processes,nginx运行的进程数,一般设置成和CPU的核数相同:
- worker_processes 1;
2、找到 worker_rlimit_nofile,nginx能打开文件的最大句柄数,修改为:
- worker_rlimit_nofile 40960;
3、找到 worker_connections,nginx进程所允许的最大的连接数,修改为:
- worker_connections 10240;
4、找到 keepalive_timeout,连接超时时间,修改为:
- keepalive_timeout 60;
5、开启gzip,找到gzip的相关参数,修改为:
- gzip on; #支持gzip压缩
- gzip_static on; #支持静态缓存模块
- gzip_comp_level 5; #gzip压缩等级,1压缩比最小处理速度最快,9压缩比最大但处理速度最慢
- gzip_min_length 1024; #设置允许压缩的页面最小字节数
- gzip_buffers 4 8k; #gzip压缩缓存,是按块大小的倍数申请内存空间,这里以8k为一块,以8k的4倍大小申请内存
- gzip_types text/xml text/css text/javascript application/x-javascript application/xml; #设置需要压缩的MIME类型
- gzip_vary on; #vary header支持
- gzip_http_version 1.1; #用于识别http协议的版本
三、php-fpm配置
打开配置文件,我的在/usr/local/php/etc/php-fpm.conf
- vim /usr/local/php/etc/php-fpm.conf
以下配置是在pm = dynamic模式下的配置:
1、找到 pm.max_children,修改为:
- pm.max_children = 8;
php-fpm子进程副本创建的最大数,创建的越多并发能力越强。同时修改空闲时进程数pm.min_spare_servers和pm.max_spare_servers,不能比pm.max_children大。
2、找到 ;pm.max_requests = 500,去掉注释,修改为:
- pm.max_requests = 250;
接收多少次请求后重新建立php-fpm子进程
3、找到 ;request_terminate_timeout = 0 设置php脚本最大执行时间,去掉注释,修改为:
- request_terminate_timeout = 100
四、系统相关
1、修改网络参数:
- vim /etc/sysctl.conf
添加:
- net.ipv4.tcp_syncookies = 1
- net.ipv4.tcp_tw_reuse = 1
- net.ipv4.tcp_tw_recycle = 1
2、修改系统ulimit限制:
- vim /etc/security/limits.conf
增加两行:
- * soft nofile 40960
- * hard nofile 40960
打开:
- vim /etc/pam.d/login
增加如下一行:
- session required pam_limits.so
在profile文件中增加一行,重启生效:
- echo "ulimit -SHn 40960" >> /etc/profile
五、Mysql 配置
- vim /etc/my.cnf
由于内存较小,不使用InnoDB,还是用回mysql5.1.x的MyISAM。如果内存足够还是推荐使用InnoDB。在[mysqld]内添加:
- loose-skip-innodb
- default-storage-engine = MyISAM
- skip-external-locking
- skip-name-resolve
- skip-networking
- key_buffer_size = 32M
- max_allowed_packet = 2M
- table_cache = 64
- sort_buffer_size = 1M
- net_buffer_length = 8K
- read_buffer_size = 1M
- read_rnd_buffer_size = 1M
- myisam_sort_buffer_size = 16M
六、php 配置
- vim /usr/local/php/etc/php.ini
1、找到:
zlib.output_compression = Off
;zlib.output_compression_level = -1
修改为:
- zlib.output_compression = On
- zlib.output_compression_level = 5
开启php gzip压缩。这里和nginx gzip压缩的东西不同,nginx是压缩html,css,javascript。php gzip是用来压缩php。
2、找到 memory_limit = 128M,修改php脚本使用的最大内存数,改为:
- memory_limit = 32M
最后重启nginx、php-fpm、mysql:
- service nginx restart
- service php-fpm restart
- service mysqld restart
参考:
http://neptune.iteye.com/blog/248846
http://www.live-in.org/archives/1580.html


文章评论